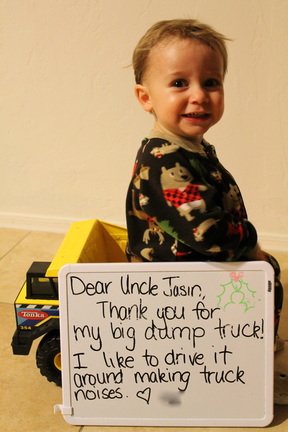
I am a big pusher of sending out thank you notes when receiving gifts. I've been writing the notes from "A", but really feel like it's not personal enough. So I came up with this idea. (And yes, it can be a bit time consuming). I let "A" play with (or wear) his new gift and set a white board next to him with a note about how much he likes it. Then I print out the picture and stick it in an envelope! Whalah! A thank you note from "A"
2 Comments
This is a super fun and super easy activity.
Supplies: - 1 white coffee filter per child - Washable crayola markers (I learned the hard way and didn't use washable) - Either. . 1 spraybottle or 1 eyedropper or cup for water - Water - 1 brown sheet of construction paper - 1 colored sheet of construction paper - scissors - pencil or pen Directions: 1) Trace your child's foot on the brown construction paper 2) Help your child cut their footprint out 3) Let your child draw a turkey face on their footprint. (You can also use colored paper to cut out a beak and use googly eyes.) 4) Let your child go crazy with the washable markers and color the ENTIRE coffee filter. Hint: You may need to hold the coffee filter while they color it and you may want to put a protective cover on the surface your child is using. 5) Wet the coffee filter to allow the colors to run together. You can wet it 3 ways. . 1) Use a spraybottle and have your child lightly spray it a couple times 2) Use an eyedropper and let your child drop a few drops of water over each part of the coffee filter. 3) Have your child wet their hand in a cup of water and spritz the coffee filter. *Don't drench it!! :) 6) Allow the coffee filter to dry 7) Glue the coffee filter onto the TOP of the separate paper. 8) Glue the footprint on the coffee filter so it's slightly lower. 9) Have your child draw legs on the turkey. We have been working really hard incorporating sign language into our daily communication with "A" and lately he's taken off with it. I absolutely love that he is able to tell us what he wants! It helps with frustration on both ends. The words we use are: hungry, more, thirsty, banana, milk, water, orange, done, shoes, socks, book, please, and thank you.
When I was little, I was actually fluent in sign language so I was lucky and didn't have to look up the words. But this is the best website (in my opinion) to learn the words. It includes a video to show you how to sign each word. http://commtechlab.msu.edu/sites/aslweb/browser.htm Another website is called "Signing with your Baby" and it has books, DVD's, and flash cards that you can buy in addition to online pictures of common words to teach your child. On a side note, although I taught "A" the correct signs, he chose to change some of them. For example, he refuses to sign "done" the way I showed him. Instead, he throws up his hands when he's done. I didn't fight him with it, and now we both know when he's done. Good luck and happy communication!!! :) Day 1: Cardboard pictures Day 2: Make a city Day 3: Make stained glass Day 4: Plant an indoor garden Day 5: Puzzles Day 6: Make your own play-dough Day 7: Put on a puppet show Day 8: Have a scavenger hunt Day 9: Plant flowers outside Day 10: Tracing Day 11: Make a photo album Day 12: Bake a treat Day 13: Sort objects Day 14: Have a "car" wash Day 15: Build a fort Day 16: Run in the sprinklers Day 17: Go Bowling Day 18: Make an edible building Day 19: Build! Day 20: Make confetti Day 21: Alphabet hunt Day 22: Write a story Day 23: Make masks Day 24: Create leaf rubbings Day 25: Make ice-cream The summer can be lllllooooonnnnngggg! But no fret, I've come up with a list of activities for you to do with your pre-schooler and/or kindergartner. Now remember, I live in the southwest and it gets ridiculously hot here, so a lot of these activities are indoor. Day 1: Cut pictures out of old cereal or crackers boxes and glue onto another piece of paper. Then use crayons to make their own picture. - Remember to have your child use "kid" scissors and please supervise. Day 2: Draw a "city" with streets and parking lots on your patio or sidewalk with chalk. Then your child can drive their toy cars around the city they created. - They sell thick sidewalk chalk at Target or the dollar store. These are good to use outside because they don't break and help with fine motor skills. (And girls will like it too. hehehe) Day 3: Make stained glass: - Stretch plastic wrap around a cutting board or plate making sure it is tight with no ripples. Then let your child draw pictures, write their name, and be creative with squeezable glitter glue. When they are finished, let it dry overnight, then peel the masterpiece off and stick on your windows. (Make sure to test a small area of your window first to make sure there is no damage) I found the glue at Joann.com for $1.50 per color. Day 4: Plant an indoor garden: Use a clear oblong container. You can buy a tupperware or recycle a container you have at home. Have your child fill it with potting soil, dig small holes, and place seeds in the holes. Teach your child to water it and place it where your family can watch it grow. The clear container allows your child to see the roots as the flowers/herbs/vegetable grow. (Tip: Let your child pick out the seeds at the store) Day 5: Puzzles: If your child has good fine motor skills, try putting together a 25-50 piece puzzle together. If your child struggles, try putting together a floor puzzle (it's just as fun, but has larger pieces). You can find floor puzzles at amazon.com Day 6: Make your own play-dough: Having your child help you, prepare the play-dough according to the directions. I found a recipe at Fun Family Education. Then sculpt, roll, squeeze, and have fun! Day 7: Puppet show! Make puppets using brown paper lunch sacks, buttons, yarn (or whatever odds and ends you have lying around the house). Then use a table with a table cloth on it for the stage. You can write the story before hand or improv. Day 8: Scavenger hunt: This will take a little preparation without the help of your little one. Take pictures of different objects you have around the house (rubber duck, toy car, an article of clothing), and hide them around the house. Then print the pictures onto one page. Give your child the page of pictures and a crayon. As they find each object, they can cross it out on the paper. When your child has found the last object, help them find the "prize". Day 9: Plant flowers outside: This may be an early morning or evening activity for us southwesterns. Give your child a couple of choices where they want to to plant flowers and let them pick. Then plant away. Let your child use a spade or small shovel to make the hole. After you put the flowers in the hole, let your child fill it in with dirt and pat it down. Day 10: Tracing: Pull out as many plastic dishes as you can. Then show your child how to trace the dishes onto paper with pencils and/or crayons. Then talk about the shapes and sizes they drew. If time permits, let your child cut out each shape. (This may require a little hand over hand help). Day 11: Make a photo album: With your supervision, help your child take 10 or 15 pictures with your digital camera. Then print out the pictures (at home or at a photo processing store). Using card stock or index, staple 10 or 15 papers together to make a book. Help your child come up with a title and write it on the first page. Then help your child glue one picture onto each page. Underneath each picture, your child can write (remember that sounding out and attempting is great) what the picture is. Day 12: Bake a treat: Pick an easy recipe that little hands can help with. Some good treats to make are: rice krispie treats, chocolate chip cookies, english muffin pizzas, no bake cookies. . . . Day 13: Sort objects: Fill a bucket with odds and ends around the house. Make sure some of the objects are related to each other. Let your child investigate the objects and see how they classify them. After they sort the objects, put them all back in the bucket and ask your child to sort them again, but in a different way. You may need to have your own bucket of different objects to model how to do it for your child. Day 14: "Car" Wash: Fill a bucket outside with water and a little bit of dishsoap. Give your child rags and sponges and let them "wash their cars". Basically let them wash their outside toys such as bikes, cars, skooters. This is a win win situations. They have fun, and your outside toys get cleaned! Day 15: Build a fort: Use pillows, blankets, furniture, or whatever you need to build an awesome fort in the middle of your house. Day 16: Run in the sprinkler: Or play with a water table if you don't have any grass. :) Day 17: Go Bowling If you register your child at KidsBowlFree.com, they can have two free games everyday this summer!!! If you don't want to go to a bowling alley, start saving your coffee creamer bottles, and clean them out. Then with a some little finger help, peel off the label, paint, decorate, and fill each bottle with sand (about 2 inches of sand). Then set up your the pins in a hallway or outside and let your child roll a ball towards them. Day 18: Make marshmallow and pretzel buildings: Using large marshmallows and pretzel sticks, help your child build structures of all types. Using marshmallows is fun because your child can stick as many pretzels in it as they want. Day 19: Build! Go to your local hardware store (or look around your house) and ask for scraps of wood. They should be pretty small and thin. Using nails and a hammer help your child nail them together. If you're feeling extra brave that day, pull out the washable paint and let them paint their masterpiece. Your child will love hammering in nails! *Please remember to supervise this activity the entire time.* Day 20: Make confetti: Give your child scraps of colored paper and a hole punch and let them go at it! If you have the hole punches that are different shapes (available at Joann's), even better! When they are done, have your child help put all the little pieces in a bag and save for future envelopes and packages you may mail later. *Some hole punches can pinch hands when they are closed. You may want to check yours before your little one goes crazy.* Day 21: Alphabet hunt: Using pre-made alphabet cards, tape them in different (but visible) spots around the house. Then help your child find each letter in order. Once they find the letter, they can grab it. You can re-do this several times (your child will most likely want to do it again). If your child has already mastered the alphabet, place sight words around the house. You say a word, and your child can go find the word and bring it to you. Day 22: Write a story: Use a notebook, or staple white paper together. Then let your child put stickers, stamps, or draw pictures on the pages. When they are done, ask them what is happening on each page, and write the story together. Day 23: Make masks Trace a mask shape on index or card stock and let your child decorate, and cut them out. Punch a hole on each side and connect with string or thin elastic. *Please help your child cut out the eyes.* Day 24: Make leaf rubbings: Go outside and find several leaves of different shapes and sizes. Place them under a piece of paper and rub over the leaf with a crayon. It tends to work better if you peel the paper off of the crayon and rub using the side of the crayon. *Try to find leaves that aren't completely dried out. Otherwise they may fall apart during the rubbing.* Day 25: Make icecream: This is a fun activity to do when it is hot. You can find the kid friendly recipe and directions at Disney Family Fun. Day 26: Have a (indoor) picnic. It may be way too hot to have a picnic outside, but there is no reason you can't enjoy one in your living room. Let your child help you make the sandwiches and sides. Place a blanket on the floor and use a basket just like you would do outside. |
About Me:My name is Melanie and I'm a stay at home mom. My husband Adam is a pharmacist and makes it possible for me to be home. We have a one year old son A, who we absolutely adore. Although sometimes my house may not look like it, (A gets into everything and makes it his job to pull whatever he can out and put it on the floor) I love to find new ways to organize my house, try new recipes, and make fun DYI projects and decorations. Archives
October 2014
Categories
All
|